bread · pumpkin · Recipes

Pumpkin Spice Rolls

Hi! I feel fall in the air. Even though the temps here in NE Ohio are quite warm, the air feels different. I’ve been studying all sorts of fall recipes and feeling downright giddy about one of my favorite baking seasons. Please give me all the pumpkin baked goods in the world! My Pinterest boards and baking notebook are overflowing with all the things I want to make! What better way to spend September than by sharing all things pumpkin?

Pumpkin Spice Rolls topped my fall baking list. I really hope you make these! They’re worth every single second you’ll spend planning, baking and eating them. I made this version a few years ago to sell at one of the farmers’ markets. My original cinnamon rolls always sold out. It was fall, I was feeling pumpkin-y and these marvelous rolls were discovered. My regular customers enjoyed them and I liked that they looked like fall. The pumpkin taste is subtle and gives the dough the most beautiful color and texture. Swapping out the cinnamon filling for a pumpkin pie spice filling is a scrumptious change.  If you’re like me and start making pumpkin recipes before stores sell pumpkin pie spice, here’s my recipe to make your own.

When you make these rolls and take that first bite, your life will be changed and you’ll probably never want a regular cinnamon roll again! Never say never. However, these are super special.

IMG_4806

This is a yeast dough recipe. Don’t be scared, it’s so simple to put together. Start with good (mostly local) ingredients. Get the sugar, milk and yeast mingling then add the rest of the ingredients and let the dough hook on your mixer do the work.  You can also knead by hand.

The big difference in this recipe is the addition of pumpkin and spices.  They really transform the texture and flavor of the dough. Once the dough comes together, place it in a bowl and put in a warm place to rise.  Step one is complete!

While the dough is rising, mix up the filling. Brown sugar and lots of pumpkin pie spice. Line a pan with parchment and butter it. The parchment is a must!

Gently roll out the dough. Once it’s rolled, smear butter all over it. Some people melt their butter to do this step but I like the butter to just be soft enough to slather it. Think back to your kindergarten finger painting days! Want in on a little secret? I write words or notes in the butter. Yep. I’ve always done that. Depending on my mood, they can be pretty interesting! Have fun and put some love into these babies!

Next comes the spices. Don’t skimp and generously sprinkle them over the butter layer! Roll the dough towards you and slice. I’ve seen all kinds of methods for slicing. The one that works best for me is my good bread knife. Try to keep the rolls tight.

Place the slices in the prepared pan and let them rise again. When they’ve doubled in size, bake them and enjoy how amazing your house smells! If you bake these in the morning hours, you will not have to beg anyone to get out of bed! The first picture below is before the rise and the third picture is after. If you don’t want to bake them right away, don’t go through with the second rise yet. You can stick them in the fridge and get them out about an hour before you want to bake them to let them rise.

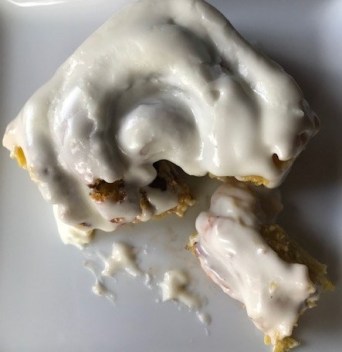
While the rolls bake, make the icing. It’s a simple vanilla cream cheese base. I also like to add bourbon. I didn’t on this batch but if you want to kick them up a notch, experiment with adding bourbon or maple syrup or more pumpkin pie spice. Even more pumpkin would be yummy!

Frosting these is somehow very therapeutic. I always do it when the rolls are warm. You can use as much or as little as you wish.

img_4780.jpg

This next step is very important. Get one out of the pan right away, sit down, take a deep breath, don’t think about anything else, and dig in. The first bite will get you feeling like this is what’s been missing from your life. The next bite will ensure that it will never be missing again. Ever.

IMG_4786

Are you doing a Pumpkin Spice Roll happy dance? Maybe it’s just me but I’ve been known to break out in dance when I eat something so good!

The day I made these, I was home alone.  I’ve been on a really clean eating plan and I haven’t had any sugar for a few weeks. Don’t even get me started on why I ever thought that was a good idea. That all flew out the window when I pulled one of these out of the pan to take photos. I was already sipping a glass of homemade cold brew (full of cream and pumpkin pie spice). I couldn’t resist and ate one of these big rolls in a matter of seconds. I love all the things about them and I enjoyed the heck out of it with my afternoon coffee. Feelings of comfort and joy came over me and I actually felt pretty darn happy in that gooey, pumpkin, spice filling, frosting, coffee moment!

I took one with me to give Carrie when I picked her up from school. She immediately lit up, thanked me, inhaled it in the car and got right to her homework as soon as she walked in the door.  See?  Life changing.

From the heart,
Shannon

IMG_4803

Pumpkin Spice Rolls
Dough
2 large eggs, at room temperature
1/3 cup unsalted butter, cut up, room temperature
4 1/2 cups unbleached all-purpose flour
1 3/4 tsp salt
1/2 cup pumpkin puree
1 tsp pumpkin pie spice
1 cup lukewarm whole milk
1/2 cup granulated sugar
2 1/2 tsp instant yeast or active dry yeast

Filling
1/3 to 1/2 cup unsalted butter, softened
1 cup brown sugar, packed (you can use light or dark or mix them)
3 to 4 TBSP pumpkin pie spice

Icing
4 oz. cream cheese, softened
2 TBSP unsalted butter, softened
2 cups confectioners’ sugar
1 tsp vanilla extract or bourbon or maple syrup
3-4 TBSP whole milk

Directions
To make the dough: Place milk and sugar in your mixing bowl.  Sprinkle the yeast on top and let sit for 4-5 minutes.  Add remaining dough ingredients to bowl and mix together and knead all of the dough ingredients to make a smooth, soft dough. You may need to add more flour if it’s too sticky.

Place the dough in a lightly oiled bowl, turn to grease all sides, cover the bowl, and let the dough rise for 60 minutes, or until it’s nearly doubled in bulk.

To fill and shape the buns: Gently deflate the dough, and transfer it to a lightly floured work surface. Roll the dough into a ~16″ x 21″ rectangle.

Spread the dough with the 1/3 to 1/2 cup butter. Write a cute word or note in the butter (do it!). Mix the brown sugar and pumpkin pie spice, and sprinkle it evenly over the dough.

Roll the dough into a log and cut it into 12 slices (about 1 inch thick).
Place the buns in a parchment lined and buttered 9″ x 13″ pan. Cover the pan and let the buns rise until they’re nearly doubled, about 30 minutes. If you aren’t planning to bake now, stick in the fridge and get them out about about an hour ahead of baking time.

While the buns are rising, preheat the oven to 400°F.
Uncover the buns, and bake them until they’re golden brown, about 15 minutes. While the buns are baking, make the icing. You can also make the icing ahead of time and keep it in the fridge for days, just let it soften up.

To make the icing: In a small bowl, beat together the cream cheese, butter, sugar, and vanilla.

Remove the buns from the oven. Spread the icing on the buns while they’re warm.
Serve buns warm, or at room temperature. Wrap in plastic and store at room temperature for a day or so; freeze for longer storage.
Yield: 12 large buns.

Jams, Purees, Sauces · pumpkin · Recipes

Pumpkin Pie Spice

It’s here!  Pumpkin spice season has become such a big deal.  It’s in everything and it’s everywhere. I’ve loved it forever. There’s just something about it that’s comfy and pleasant. I feel cozy whenever I add it to a food or drink.

The challenge I encounter this time of year is that pumpkin pie spice is in everything but it’s hard to find the actual spice. It seems like it’s not available until end of October and I get on the pumpkin baking train in September. Maybe August.  It’s also kind of expensive. I make my own. I actually like it more than store bought.

You can make as much as you want. Some for you and some to share. I like to include a small jar with a pumpkin baked good as a gift. It just makes it feel more special!

Start with really good spices.  You’d be surprised at how many extra ingredients are added to spices.  No need for the preservatives or anything else that’s not the spice name. The great thing about making your own pumpkin pie spice is you can MAKE IT YOUR OWN! This is the combination I like! Bring on all the warmth with cinnamon, nutmeg, allspice, cloves and ginger. Combine and store in a jar or container.

IMG_4765

I use this mixture in all my fall pumpkin baked goods and drinks. It’s yummy in cold brew and hot coffee/tea (I add it to my coffee grounds before brewing) and much less expensive and more healthy to make your own seasonal drinks at home. All the pumpkin things need the spice: breads, crème brûlée, cinnamon rolls, pies, cookies, french toast, oatmeal, coffee, cocktails and anything else you can put a fall spin on.

I indulge in this spice throughout the fall and winter seasons. As a matter of fact, since typing this, I’ve felt the urge to put on a big sweatshirt and enjoy a little pumpkin pie spice treat (that recipe will be posted tomorrow)! Cozy up, friends!

From the heart,
Shannon

Pumpkin Pie Spice
3 TBS Ground Cinnamon
2 tsp Ground Ginger
2 tsp Ground Nutmeg
1 1/2 tsp Ground Allspice
1 1/2 tsp Ground Cloves

Combine and place in an airtight jar or container. You can double or triple this to make enough to share.

bread · Recipes

Zucchini Bread

Yesterday, I went to my favorite farmers’ market, Countryside in Howe Meadow.  After being gone for most of July, I’m back in the swing of things and getting my hands on as much local, summer fruits and veggies as possible!

I’ve always liked zucchini.  Before the days of zoodles, I prepared it all sorts of ways.  I grilled it, baked it and baked WITH it.  It’s versatile and healthy.  Zucchini has a decent amount of potassium and is loaded with vitamin C.  It’s good for your heart!

IMG_4029

Zucchini bread is one of those seasonal indulgences that just feels right about this point in the summer.  Sliced and toasted with good butter or cream cheese. Yum!  While at the market, I picked up a jar of cashew almond butter from my friends at Nosh Butters.  If you haven’t tried their nut butters, I encourage you to partake in their samples the next time you see them at an event.  All of their flavors are delicious as well as vegan, gluten free, and palm oil free.  I’ve been known to hang out with a jar of nut butter and a spoon on occasion and theirs are some of my favorites.  Plus, their business philosophy is right on and it’s another local, small business we can support!

While hanging at their booth at the market, it dawned on me that nut butter would be delicious smeared on zucchini bread.  Yes!  The cashew almond variety is mellow and has just the right texture to slather on some beautiful bread.  I covered up all the pretty green flecks of zucchini before I took this photo.  I promise, they’re in there!

IMG_3996

If you’re loving all the zucchini and looking for ways to bake with it, try this recipe and get some Nosh nut butter to take it over the top! My recipe is light and not weighed down by tons of brown sugar like some of the ones I’ve seen.  You can certainly make this your own by substituting gluten free flour, adding nuts, berries and change the oil type to suit your taste.  This recipe can simply serve as a guide!  🙂

Summer harvest is upon us and I’m digging it!  What are some of your favorite ways to make zucchini?  I’d enjoy hearing new ideas!  Happy baking!

From the heart,
Shannon

IMG_4023

Zucchini Bread
You don’t even need a mixer for this recipe! It can be made in a regular loaf pan, mini loaf pans or a lined muffin tin.  I usually double or triple it and make tons to freeze or hand out to neighbors, friends and local businesses.

Ingredients:
3 cups unbleached all-purpose flour
1 teaspoon aluminum free baking powder
1 to 2 teaspoons ground cinnamon
1/2 teaspoon salt
1/4 teaspoon baking soda
1/3 cup coconut oil melted (or whatever oil you like to bake with)
1 teaspoon grated lemon rind
2 teaspoons vanilla extract
3 large eggs, lightly beaten
1 1/2 cups sugar
3 cups shredded zucchini (12 ounces)
1/4 cup coarsely chopped walnuts, toasted (optional)
Cooking spray

Preparation:
Preheat oven to 350°.
Lightly spoon flour into dry measuring cups; level with a knife. Combine flour and next 4 ingredients (through baking soda) in a large bowl. Combine wet ingredients in a large bowl; add sugar, stirring until combined. Add zucchini; stir until well combined. Add flour mixture; stir just until combined. Stir in walnuts (or fruit) if using.

Divide batter evenly between 2 (8 x 4-inch) loaf pans coated with cooking spray. Bake at 350° for 1 hour or until a wooden pick inserted in center comes out clean. Cool 10 minutes in pans on a wire rack; remove from pans. Cool completely on wire rack.  Adjust baking time depending on what size bread you’re making.

Doggy Treats · Recipes

Doggy Treats

Hi!  I hope your summer is in full gear and you’re finding time to slow down a little and enjoy the outdoors and sunshine!  We’re on our second road trip this month and ready for more adventures in July!

First, there’s a little celebration in order for our sweet beagle, Daisy Mae.  She’s two today!  That adorable girl stole my heart when she was just a few weeks old.  Those long velvet ears and white tipped tail were just too much cuteness!  We brought her home when she was 7 weeks and I’m thankful I get to live among the tribe of dog mamas!

The foodie side of me kicked in shortly after we got her and I started researching all types of dog food and what’s best to feed beagles.  She certainly gets her fair share of homemade food and treats.   In fact, we joke that she eats better than most humans!

This was the day we brought her home and she’s had our hearts ever since!

I recently started making Daisy treats.  I’ve made her food and homemade broth for a while but never got around to making treats.  This recipe is super easy and she loves them!  It’s just 4 ingredients and healthy. Daisy’s birthday seemed like a great time to share a doggy treat recipe.

I didn’t get a photo of the oats and bananas before I mixed the dough together.  I put oats, mashed bananas, coconut oil and peanut butter in my mixer bowl and mixed it all together.  Coconut oil is so good for dogs!

IMG_1908

Next, roll out the dough.  It’s kind of sticky so keep adding oats, as needed, and roll it out.  You can use any shape cookie cutter or just cut into bars.  I added dried blueberries to half my dough.  Add ingredients or modify for your doggy’s taste!

They smell really good while they’re doing their thing in the oven!

IMG_1920

Daisy Mae knows what’s up when Mama’s been baking!

I’m more thankful than ever for this sweet girl and what she’s given me.  I’ve had quite a few friends and family members lose their pets lately and it makes me so sad for them.  I never considered myself a dog person, until Daisy joined our family.  Since then, I’ve fallen head over heels for her and have a whole new appreciation of the bond between humans and their pets.   I’m giving her extra love and hugs today!  Happy 2nd birthday, Daisy Mae!

Try the recipe below and let me know how you like it!

From the heart,
Shannon

IMG_2111

Doggy Treats
Ingredients
3 cups old fashioned oats (you may need a little more)
2 ripe bananas, mashed
1/4 cup all-natural peanut butter
1/4 cup coconut oil, melted

Directions

  1. Preheat oven to 350 and line a baking sheet with parchment paper.
  2. In a large bowl, combine oats, bananas, peanut butter and coconut oil.  Keep adding oats until the dough is no longer sticky.
  3. Knead the dough until it comes together.  Roll the dough out to about 1/4 inch thickness.  Using a cookie cutter, cut desired shapes and place on baking sheet.  If you want to just cut small bars, that works too!
  4. Place in oven and bake until the edges are golden brown, about 10-15 minutes.
  5. Let cool completely.  Store in fridge or freezer.  Daisy loves them frozen and they’ll keep longer.

IMG_3444

Jams, Purees, Sauces · Recipes

Berry Jam

Happy Saturday!  I mentioned in my previous post that I’d share my easy jam recipe.  I don’t use pectin or spend hours making jam.  This jam is bright and fresh and can be modified to include your favorite seasonal berries.  I’ve made variations with strawberries, blueberries, blackberries and mixed in different herbs like thyme and basil.

I love it and everyone I’ve made it for loves it!  It’s yummy on toast, scones, biscuits and makes an incredible topper for ice cream.  If you’re like me and scooping up all the fresh, local berries you can right now, give this jam a try.  It’s easy and delicious!

IMG_2006

Start with berries.  It’s strawberry season so that’s what I’m using.  Slice them and place in a medium saucepan.  Lightly mash the berries.  Add maple syrup, lemon juice, orange juice and herbs if you’re using.

IMG_1841

Bring the mixture to a simmer and cook for 55-60 minutes.  Cool and jar it up!

Super simple.  This also makes a fun gift that’s jam packed with love!  🙂  The full recipe is below. Have fun!

From the heart,
Shannon

Berry Jam

Ingredients
About 6 cups berries (strawberries, blueberries, blackberries–use one kind or mix)
1 cup pure maple syrup
2 tablespoons fresh lemon juice
2 tablespoons fresh orange juice
Optional:  2 1/2 tablespoons chopped fresh thyme or basil or rosemary leaves

Directions
Place the berries in a medium saucepan. Lightly mash the berries (you can use a potato masher, pastry blender or a fork). Add the maple syrup, lemon juice, orange juice and herbs if using. Bring the mixture to a simmer and cook, stirring occasionally for 55-60 minutes until thick. Cool for about 2 hours. The jam will continue to thicken. Refrigerate in air-tight jars for up to 1 month. Spread on everything!

IMG_2005

cake · Recipes

Strawberry Fields and Cake

It’s summer break and we’ve had lots of rain here in NE Ohio.  School’s out and our schedules have shifted nicely to planning days packed with fun and nights that go a little later to allow for a decent amount of hammock time, games and star gazing (and more wine).

One of the many things I love about this time of year is all the fresh, local produce.  It fills me with joy!  A couple weeks ago, we grabbed strawberries from Huffman Fruit Farm at the Countryside Farmers’ Market.  We almost ate all of them before we got home!  All of a sudden, it tasted like summer.  I’ve been making a list of recipes I want to make over the next couple months and Strawberry Chamomile Olive Oil Cake with Honeyed Ricotta (mouthful), was on deck.  I found the recipe on one of my favorite blogger sites, Half Baked Harvest, and I knew it would be amazing! Everything I’ve tried on her site has been simple and yummy.

We decided to pick strawberries at Rittman Orchards and what a fun time!  We took Carrie’s friend and Daisy and started picking.  The weather was perfect and the view was incredible!

I couldn’t wait to get started on making something strawberry!  I made jam ASAP (I’ll share that recipe next) and then prepped everything to get going on the cake.  I’ve never made an olive oil cake before and my daughter, Hannah, and I were talking about making one the next time we’re together.  After making and eating this one, I’ll make an olive oil cake anytime!

This cake is light and refreshing and made me feel happy while I ate it.  It’s not too sweet and just melts in your mouth.  I love the simplicity.  It’s quick and easy to prepare for summer get togethers, brunch, birthdays or the upcoming Father’s Day weekend.  What dad wouldn’t love this?

IMG_1939

It all starts with fresh ingredients.  The cake is easy to prepare and using local eggs makes all the difference.  I used eggs from Mud Run Farm and that color is just what you want for this cake.

Once the cake was in the oven, I steeped chamomile tea bags in local honey from Brighton Wool and Honey.  The sliced strawberries took a dip in the infused honey.

This picture captures the moment nicely.

IMG_1904

Next up, was the honeyed ricotta.  Ricotta with honey and lemon whipped in the food processor until smooth and fluffy.  Easy.

IMG_1905

Did I mention Carrie’s friend slept over?  Here’s a view of our kitchen while I was making cake and breakfast.  This is real life and pictures that usually get posted don’t always share what’s really happening behind the scenes.  I love it! Could there be more going on in that small space?  🙂

IMG_1896

The cake finished baking, the strawberries were soaking and the ricotta was setting up in the fridge.  On our way back from taking Carrie’s friend home, I saw daisies growing on the side of the road and a bunch came home with us.  Some went in a mason jar while others adorned the cake.  So sweet.

I had so much fun putting on the finishing touches and photographing this cake.  It was even more fun to eat and I highly recommend making it! Just look at the inside.  It’s a beautiful color and texture.  I am delighted when baked goods turn out so well!

IMG_1936

IMG_1947

As we were eating it, we talked about what we’d change or add.  It would be amazing with blueberries or raspberries!  I liked the ricotta but I think I’d substitute mascarpone next time.  I love the taste and texture of mascarpone and think it would compliment this very well.  You can also do whipped cream but the idea of whipped ricotta or mascarpone make it feel a little more special and unique.  Try it.

I did some research on how to share recipes I’ve found in cookbooks or online.  I made slight changes to the recipe, but not enough to take any credit for it.  Go to Half Baked Harvest to follow it exactly.  While you’re there, try all of her recipes.  She’s amazing and I’m thankful she shares her love of food with us!

This cake is versatile and you can easily modify to make it your own!  Let me know if you make it and how you like it!

From the heart,
Shannon

bread · Recipes · Uncategorized

School’s Out (and a banana bread recipe)

It’s the end of the school year.  Wait, what?  Wasn’t it just December? We were so exhausted from all the homework, studying, play rehearsals, field hockey games and practices, voice lessons, ski club, swim meets, theatre classes, lacrosse games and practices, birthday parties and everyday school and work life.  It felt like there was no end in sight!  Yet, here we are and school is winding down and summer break is here and I’m not at all sad about it!

Last summer, was the summer dreams are made of.  We went on an amazing trip out west.  Carrie, Daisy (our beagle) and I drove across the country from Ohio and met up with Casey (my husband) in Salt Lake City, then headed to Lake Tahoe.   The drive was long, tiring and exhilarating all at once!  Daisy was so confused but quickly learned about long stretches in the car, bathroom breaks at random gas station grassy areas and hotel elevators.  It was quite the adventure driving to Tahoe.  Once there, we hiked, swam and played continuously for a couple weeks.  Carrie turned twelve in Tahoe and I wanted to stay in those moments forever.

We left (reluctantly) and she started 7th grade with all the excitement the start of the school year brings.  We heard this year would be brutal and that was no lie.  She’s learned a great deal about time management, BIG school projects, hours of studying and relationships (good and bad).  I learned a lot about patience, acceptance and letting go and maybe some new wines I hadn’t tried. 🙂  Middle school is hard!  Of course, she got through it and I’m so proud of her for trying new things, getting good grades and navigating through some tough situations!

We usually go all out on end of the year teacher gifts.  Last year, we made these cute baskets for DIY Sparkling Rosemary Lemonade and relaxation.  Big surprise…I like to go the homemade route!  They were so fun and the teachers loved them!  As a matter of fact, most of them told me the only thing missing was vodka.  Truth!

IMG_6129

This year, Carrie’s a little older and we’ve done teacher gifts throughout the year and I’m not sure it’s still “cool” to give teachers big homemade presents.  So, for the last day, we chose to do something a little more simple by making homemade banana bread and include sweet notes and gift cards from Carrie.  Teachers work countless hours and we hope this small, but loving, treat helps them know how much we appreciate them!

I’m sharing a banana bread recipe I’ve made for years.  It’s not heavy because it calls for yogurt instead of a ton of butter and oil.  You can also make it your own by adding all sorts of things like coconut, chocolate chips, toasted walnuts, pecans, cinnamon…the sky’s the limit!  Go BANANAS!  I’ve included other options below in the recipe.

You’ll start with some super ripe bananas (I didn’t get a picture of those before I started making this recipe).  Measure out your dry ingredients, prep loaf pans and combine the small amount of butter and sugar with a mixer until light and fluffy and add eggs, one at a time.  Then add mashed bananas, yogurt and vanilla.

I made three recipes here and I wanted to make mini loaves.  I wash and reuse the foil loaf pans and simply spray them with coconut oil.  You can use a larger pan or make muffins, just adjust baking time. I also use really good vanilla when I bake.  My favorite is Nielsen-Massey Madagascar Bourbon Vanilla Extract and I mostly buy it on Amazon. I buy in bulk and just keep refilling my smaller jar.  Can you tell it’s been with me forever?

Once the batter is combined, pour into pans or muffin tins.

For this recipe, I kept the batter plain because I didn’t want to worry about nut allergies or anything.  To make it feel a little more special, I love to sprinkle raw/turbinado sugar on top to give the bread a little crunch and fun sparkle.

Bake the bread and let cool slightly, then remove from pans and allow it to completely cool on a rack. By now, your house will smell amazing and you should probably make sure the bread is everything you want it to be.  Have a fresh, warm slice.  Smear it with almond butter or peanut butter or cream cheese or honey.  Brew a pot of coffee.  Take a moment to breathe and indulge.  Yes, please do all of this because it’s almost SUMMER!

IMG_1725

Back to the task at hand.  Once our loaves cooled, we placed them in bags and attached notes from Carrie.  I love that she enjoys hand-writing thank you notes.  She took some time and reflected on her school year and thought about what each teacher means to her.  Writing thank-you notes and giving a homemade gift is such a win-win.  It feels good all around!

IMG_1735

This bread is so easy, makes the perfect gift for anyone in your life and can be frozen for special weekend breakfasts and snacks.  Heck, you don’t even have to wait for the weekend!  I saved a loaf to have for our first official day of summer break breakfast.  Yes! I hope you make it and love it and give it!

Classic Banana Bread

Ingredients
2 cups unbleached all-purpose flour or use whole wheat pastry flour (I love King Arthur flours)
3/4 teaspoon baking soda
1/2 teaspoon salt
1 cup sugar (you can use coconut sugar or granulated white sugar)
1/4 cup unsalted butter, softened
2 large eggs
1 1/2 cups mashed ripe banana (about 3 bananas)
1/3 cup plain nonfat yogurt
1 teaspoon vanilla extract
Cooking spray (coconut is my preferred)

  1. Preheat oven to 350°.
  2. Lightly spoon flour into dry measuring cups; level with a knife. Combine the flour, baking soda, and salt, stirring with a whisk.
  3. Place sugar and butter in a large bowl, and beat with a mixer at medium speed until well blended (about 2 minutes).
  4. Add the eggs, 1 at a time, beating well after each addition.
  5. Add banana, yogurt, and vanilla; beat until blended. Add flour mixture; beat at low speed just until moist.  Spoon batter into an 8 1/2 x 4 1/2-inch loaf pan (or mini size pan or muffin tins) coated with cooking spray.
  6. Bake at 350° for 1 hour (or less if you use a smaller pan) or until a wooden pick inserted in center comes out clean. Cool 10 minutes in pan on a wire rack; remove from pan. Cool completely on wire rack. Wrap or place in a storage container to keep fresh. Freezes beautifully!

Your can make this banana bread fit what you’re craving by following some of these options:
Marble style: Stir 1 cup batter and 1/2 cup melted semisweet chocolate chips together in a small bowl. Spoon plain batter into pan, alternating with dollops of chocolate-chip batter. Drag a knife through batter to swirl. Bake as directed.

Berry style:  Fold 1 cup fresh blueberries into batter. Bake as directed.

French-toast: Cut bread into 3/4-inch slices. Toast until slightly crisp on both sides. Whisk together 2 eggs, 2 Tbsp. milk, ground cinnamon and nutmeg to taste as well as a pinch of salt in a shallow bowl. Dip bread in mixture, let excess drip off, then place on a hot griddle, turning once.

Chocolate-chip style: Fold 1 cup dark  or semi sweet chocolate chips into batter. Bake as directed.

Streusel style: Combine 2 Tbsp. rolled oats, 2 Tbsp. flour, 1 Tbsp. brown sugar, 1 Tbsp. butter, melted, and 1/4 tsp. ground nutmeg in a medium bowl. Divide batter among 12 paper-lined muffin cups. Top with streusel. Bake at 350°F until done, about 25 minutes.

Coconut style:  Fold 1 cup shredded coconut into batter.  You can even add lime juice and zest or make a lime glaze for the top to take you away to the tropics.  Bake as directed.

*Recipe adapted from Cooking Light magazine


bars · Recipes

S’mores Bars

Happy Friday!  I’m sitting in my kitchen looking at the sunshine hitting the trees in my backyard and hoping it’s going to be a nice weather day.  That sun gives me life!  Memorial Day weekend is upon us and the official summer kick off begins.  In honor of all those who made the ultimate sacrifice, the veterans and active service women and men, I thank you!

I don’t have Memorial Day traditions.  When I had Rosie, I was usually at events over the weekend and prior to that, plans always varied.  I’m looking forward to three full days of Carrie time and wrapping our heads around school winding down and summer getting started.  I hope we get to hit a bike trail, get to some local markets and soak up as much outdoor and mama/daughter time as possible.

Outdoor time usually means a little fire pit time for us and that means s’mores time!  Not too long ago, I started making these S’mores Bars and the kids at Carrie’s school have really fallen for them.  We LOVE s’mores!  Recently, I started making my own graham crackers and also learned to make marshmallows.  As a matter of fact, I think I’ll write a post about those so you have recipes to make your own for your s’mores adventures this summer.

These bars aren’t my idea of the healthiest things to make (store bought marshmallows–not usually my thing) and eat, but they’re a fun treat and kids (of all ages) enjoy them.  They’re perfect to take to get togethers and might be fun to make and take this holiday weekend.  They’re easy and gooey and give you that s’mores feeling even when there’s no campfire. HOWEVER, if you have a chance to have a fire, do that instead and make s’mores or just grab one of these beauties!

IMG_1331

It all starts with making a graham cracker crust that’s less of a crust and more like a chewy, graham, buttery cookie.

How cute is that little bowl and whisk with the eggs in it?  My bonus mom got that for me from a pottery place in Tennessee for Christmas and it’s perfect for whisking and pouring eggs.  Pottery is just the best!

Once the crust is made, save about 1/4 of it and press the rest into a 9 x 13 pan that is lined with parchment paper and sprayed.  Trust me on this step!  Do you see who’s watching to make sure I do this right?  🙂 Thanks, Daisy Mae!  What a cutie!

Next is just layering the chocolate and marshmallows.  I used a combination of semi-sweet and milk chocolate chips.  You can use chips, chunks and any flavor you like.

For the crust you saved, press it into flat rounds and lay out over the top.  Leave room for the marshmallows to come through so you can see it all when it’s baked. So simple!

Bake at 350 for 25-35 minutes and cool completely.  This is when the parchment paper becomes your best friend.  Lift the bars out and cut them with a sharp knife.

IMG_1328

When they’re still a little warm, the marshmallow pull is satisfying and kind of makes me want to sit down, indulge in one immediately and simply enjoy all the graham, chocolate, marshmallow goodness.  I mean, why not?

I made these to share with all the kids in the middle school musical.  They had a big dress rehearsal and I thought it would be a fun treat to celebrate all their hard work and wish them luck in their performance. They’re easy to package and the kids gobble them up!

IMG_1337

Make these for all the people in your life, especially, the little ones!  For some reason, s’mores anything gets the kids (and grown ups) excited and, just like that, it feels like SUMMER!  Let me know if you make these bars (recipe is below) and, if so, what you think.  Here’s hoping for nice weather and outdoor time so we can all enjoy our weekend!

From the heart,
Shannon

Ingredients
2 cups unbleached all purpose flour
2 cups graham cracker crumbs
1 tsp baking powder
1/4 tsp salt
1 cup unsalted butter at room temperature
1 1/2 cups light brown sugar packed
2 large eggs lightly beaten
2 1/2 cups mini marshmallows
1 1/2 cups semi-sweet chocolate chips (you can use chunks as well)

Instructions

  1. Preheat oven to 350 F. and grease and line a 9×13 baking pan with parchment paper, ensuring that the paper along the long sides extends above the pan a bit, to act as handles to remove from the pan later. Set aside.
  2. In a large bowl, whisk together the flour, graham cracker crumbs, baking powder and salt. Set aside.
  3. In a large bowl with an electric mixer or in the bowl of a stand mixer with a paddle attachment, beat together the butter and brown sugar until light and fluffy, about 2 minutes. Scrape down sides of bowl.
  4. Add eggs and beat until well combined. Reduce mixer to low and slowly beat in the flour mixture until combined.
    Remove and set aside about 1/4 of the dough. Press the remaining dough into the prepared pan to form a thin, even layer on the bottom of the pan.
  5. Top with chocolate chunks, then marshmallows. Scatter the reserved dough over-top in clumps. Don’t place too close together so you can see the marshmallows.
  6. Bake in preheated oven until golden brown, about 30-35 minutes. Set pan on a wire rack to cool completely, then lift out of pan by grabbing the parchment paper. Remove to a cutting board. Cut into squares.
Pie · Recipes

Hola! (and a pie recipe)

This weekend is full of opportunities to get in the kitchen and make something!  Derby Day AND Cinco de Mayo.  Bourbon AND tequila.  YES!  I was hoping to make a new Derby Day dessert but our week was busy with school and extracurricular activities.  Saturday morning was super hectic; Carrie had voice lessons then a theatre performance so there just wasn’t time.  Plus, it hasn’t stopped raining and I’m not even going to get started on what that does to my energy.

I’m not a hard-core, gotta celebrate Cinco de Mayo kind of person.  However, any chance to eat tacos, chips, salsa and guac is good enough reason for me to join in the festivities!  We’re planning to make tacos and have all the fixins.  Recently, I’ve been passing on the tortillas and making taco bowls using cauliflower rice as the base and topping it with all the good stuff.  I know, cauliflower is everywhere but it’s so good as a taco bowl base and adds a boost of healthy.  For dessert, it’s key lime pie and I’m not adding any cauliflower!

I am adding something new to my tried and true recipe.  A few weeks ago, I was talking with my friend Linda (Linda’s Other Life).  She and her family made key lime pie for Easter.  She told me her daughter-in-law added macadamia nuts to the crust.  Well, that certainly got my attention, so I added them to my graham cracker crust.  That’s one of the things I love about food, it truly connects us.  I feel more connected to Linda and her family by simply adding nuts to a crust.  It also gave me a way to slightly enhance my pie!

IMG_1343

I made my key lime pie this morning.  I’m including the recipe below and am attempting some step by step photos.  Again, it was raining and the lighting was not ideal.  Who cares?  It’s pie, it’s fun and I can’t wait for dessert time! Also, none of this is about perfection, it’s about doing something enjoyable.

This pie is so simple and, to be honest, I never made one until a couple years ago.  I was always afraid of it.  I found a couple of recipes online and it seemed simple, so I tried it.  Happy day for me!  Simple ingredients and quick preparation.

IMG_1349

Start with the crust.  Again, I’m adding chopped macadamia nuts to the graham cracker crumbs (thanks to Linda’s tip).  I gave them a rough chop because I want to see and taste them.  Combine the graham cracker crumbs with the nuts, sugar and melted unsalted butter and press into a pie dish.

While that’s baking, make the filling.  I start with beautiful, local egg yolks and lime zest.  Most of the time, I try to make all the ingredients for what I’m making.  Key lime pie really needs sweetened condensed milk and I just buy it.  If you can find key limes, then squeeze away!  I used a combination of key lime and regular lime juice.  Whip it all up and pour into the partially baked crust and bake a little longer to set it. Side note: see those pieces of macadamia nuts in the crust? I can’t wait!

When it cools a little, top it with whipped cream.  I start with a frozen bowl then whip heavy cream, a little sugar and vanilla until it’s thick.  You may like a little whipped cream on top so you can see the beautiful pie filling come through.  Personally, I like to have the whipped cream in every bite, so I pile it on!  It’s such a nice flavor with the tartness of the filling.

You can top it however you wish!  Get creative and let your key lime juices flow!  This pie is easy, delicious and always a crowd pleaser!  It’s perfect for Cinco de Mayo and any other day of the year.

IMG_1380

If you make it, please let me know how it turns out and if you have any other ideas to make it unique!  Adios!

From the heart,
Shannon

Key Lime Pie with Macadamia Nut Graham Cracker Crust
Serves 6-8 people and takes about an hour to prep and bake then another couple hours in the fridge. It’s creamy, tart and that crunchy crust is divine. I’ve also made this in a sheet pan and cut into squares for larger crowds.  However you make it, have fun!

Crust
7 tablespoons unsalted butter, melted
2 cups graham cracker crumbs
1/2 cup coarsely chopped macadamia nuts
1/4 cup sugar
1/4 teaspoon sea salt

Filling
1 tablespoon lime zest
3 egg yolks
1 can (14 oz.) sweetened and condensed milk
3/4 cup lime juice (can be key limes, regular limes or the bottled key lime juice)

Whipped Cream
1 cup heavy whipping cream
3 tablespoons sugar (more if you want it sweeter)
splash of vanilla

Directions:
1. Preheat oven to 350°F
2. Melt butter and chop macadamia nuts
3. Combine graham cracker crumbs, nuts, sugar, salt and butter in a bowl.
4. Put mixture in a 9-inch pie dish and press down with your hands and up the sides of the dish
5. Bake for 10 minutes

While cooling, make the filling
1. Mix egg yolks and lime zest with a mixer for 2 minutes
2. Add sweetened and condensed milk and mix for 3-4 minutes until thickened
3. Add lime juice and combine well
4. Pour mixture into pie crust and bake for 15 minutes until set
5. Let pie cool at room temp for about 30 minutes then place in fridge

Make the whipped cream (almost there!)
1. Whip cream, sugar and vanilla until nice and thick in a bowl that has been placed in the freezer
2. Once it’s the thickness you prefer, taste it for sweetness.  You can also add a dollop to your coffee while you’re finishing up the pie…just an idea!
3. Top key lime filling with whipped cream, sliced limes, lime zest and store in the fridge until ready to serve Enjoy!

Recipes · Savory Dishes

Third Grade and Rustic Tomato Tart Recipe

Things have been a little hectic in our house lately as both my daughters started school this week.  I’m sure many of you are facing the same brutal reality that summer break is coming to an end.  Hannah and I hit the road Tuesday to move her into her dorm room.  She is happily embarking on year 2 of college and I couldn’t be more proud (and kind of sad because I miss having her around)!  I made the 9 hour drive back home on Wednesday and Carrie started third grade Thursday.  Our school district has different buildings for different grade levels.  Last year, Carrie was in a building that was first and second grades.  This year, she switched to a much larger school for grades 3, 4 and 5.  She was really excited and popped right up out of bed, ate breakfast and we were out the door no problem.  When we got to school and she saw all the other kids, she seemed a little nervous (4th and 5th graders can be intimidating).  Of course, she had a fantastic day, loves her new teachers and saw many of her friends!  My sweet girl is growing up way too fast!

photo 1

To help ease the transition from summer break to school days, I thought I’d surprise her with one of her favorite dishes for dinner and really celebrate her first day of third grade.  I’ve made this Rustic Tomato Tart a couple times this summer.  As a matter of fact, this is Carrie’s request for her birthday dinner every July.  I snagged some gorgeous tomatoes from a farm stand in North Carolina on Wednesday and couldn’t wait to top off Carrie’s first day of school with a delicious summertime dinner!

As I started preparing the dough, it dawned on me that I could share this with everyone.  I came across this recipe in Cooking Light several years ago and it has been a dish my family looks forward to every summer.  It’s not fancy but it is so yummy!  The preparation includes several steps but they are not hard and totally worth it; all that’s required is a little patience.

I didn’t capture photos of the dough making because I thought about posting it after I finished that part.  The dough calls for fresh corn kernels (I just cut them right off the cob), a little lemon juice and sour cream.  I toss all that into my little magic bullet to blend then add them to the flour, cornmeal, butter and salt.  I use my hands to make the dough then roll it out between sheets of plastic wrap.  I then put the rolled out piece of dough on a flat cookie sheet and stick it in the freezer until I’m ready to assemble.  Today I made the dough early and left it in the freezer for a few hours.  It works like a charm and makes dinner prep much easier to do this step ahead of time.  My tip on cornmeal is to use coarse grind.  It gives the dough a nice little crunch and I love it so much more than regular cornmeal in this recipe.

photo 3

If you are already thinking this recipe sounds too complicated, stick with it!  This tart is scrumptious and, once you try it, you’ll be looking for every reason to make it again.

I sliced the tomatoes then placed them on paper towels and salted them.  The salt draws out some of the moisture.  Then I grated the cheese, grabbed the dough, preheated the oven and started putting the whole thing together.  Those are some good-looking tomatoes, huh?  I like to use a combination but you can use whatever kind you have on hand.

photo 1-27            photo 2

Once I remove the plastic wrap from one side of the dough (it’s much easier to remove while the dough is frozen), I flip it onto a piece of parchment paper that is covered with the cornmeal.  Next, I remove the other pieces of plastic wrap and start with the first layer of fontina cheese, fresh basil and flour.  The scissors pictured here are amazing!  They are herb scissors and they make life so easy!  The flour gets sifted over the cheese to keep the crust from getting too soggy from those juicy tomatoes.

photo 5 photo 6 photo 7

Here come the tomatoes!  Just one layer for now and leave a little dough border.  Beautiful!

photo 8

One more sprinkle of flour then another layer of tomatoes.

photo 9               photo 10

This part is fun and where the term “rustic” comes in.  Simply fold the dough around the tomatoes.  See the flecks of cornmeal?  You’re going to love the crunch!

photo 11                      photo 12

Pop it in the oven for about 30-35 minutes.  It will be golden brown and the tomatoes will be cooked.  I like to sprinkle more cheese (yep) on top and let it melt for a few minutes at the end.  Once I take it out of the oven, I top it with more fresh basil.  It looks pretty and, truth be told, I could eat basil 24/7 when it’s tomato season!  MORE BASIL!

photo 13             photo 14

photo 16

There you have it!  It’s fresh, healthy and delicious!  Carrie LOVES this dish!  Please don’t be intimidated by the numerous steps.  Once you make it a couple times, you’ll find it’s really simple.  Besides, you can’t mess it up because it’s rustic!  Find something to celebrate this weekend and make this before all the tomatoes are gone.  Let me know how it turns out!

From the heart, Shannon

photo 17

Here’s the full recipe from Cooking Light.  Again, I usually make the dough ahead of time.

Rustic Tomato Tart

1 1/2 pounds medium yellow tomatoes, cut into 1/4-inch-thick slices
1 1/2 pounds medium red tomatoes, cut into 1/4-inch-thick slices
1 1/2 teaspoons salt, divided
1 cup fresh corn kernels (about 2-3 ears)
1 tablespoon fresh lemon juice
3 tablespoons fat-free sour cream
1 1/2 cups all-purpose flour
1/4 cup yellow cornmeal
1/4 cup chilled butter, cut into small pieces
1 tablespoon yellow cornmeal (Bob’s Red Mill coarse grind is really good!)
1/2 cup thinly sliced fresh basil, divided
3/4 cup shredded fontina cheese
2 tablespoons all-purpose flour
1/4 teaspoon cracked black pepper

Preparation

Arrange tomato slices in a single layer on several layers of paper towels; sprinkle with 1/2 teaspoon salt. Let stand 20 minutes; blot dry with paper towels.
Preheat oven to 400°.
Place corn, juice, and sour cream in a food processor or blender; process until smooth. Combine 1 1/2 cups flour, 1/4 cup cornmeal, and 1/2 teaspoon salt in a large bowl; stir with a whisk. Cut in butter with a pastry blender or 2 knives until mixture resembles coarse meal. Add corn mixture; stir until a soft dough forms. Knead gently 3 or 4 times.
Slightly overlap 2 (16-inch) sheets of plastic wrap (or parchment paper or wax paper) on a slightly damp surface. Place dough on plastic wrap; press into a 6-inch circle. Cover with 2 additional (16-inch) sheets of overlapping plastic wrap. Roll dough, still covered, into a 14-inch circle; place on a large baking sheet in freezer 10 minutes or until plastic wrap can be easily removed. Line baking sheet with parchment paper; sprinkle paper with 1 tablespoon cornmeal. Remove 2 sheets of plastic wrap from dough. Place dough, plastic wrap side up, on baking sheet. Remove top sheets of plastic wrap.
Combine 2 tablespoons flour and 1/2 teaspoon salt. Arrange half the cheese on dough, leaving a 1 1/2-inch border. Top with basil. Using a sifter or sieve, sift 1 tablespoon flour mixture over cheese mixture. Arrange half of tomatoes over cheese mixture. Sift remaining flour mixture over tomatoes; top with remaining tomatoes. Fold edges of dough toward center; press to seal (dough will only partially cover tomatoes). Bake at 400° for 35 minutes or until crust is brown; let stand 10 minutes. Sprinkle with remaining cheese and bake until cheese is melted. Remove from oven and top with fresh basil and pepper.